Image based lighting often times simplifies getting started with a good lighting setup when trying to integrate CG into life action. Often times it’s beneficial to have the IBL sphere to just contain the ambient lights from the environment and therefore to paint out any actual light sources from the set. Those can then be used on separate lights to give the main illumination from the set lights, while the IBL sphere contributes ambient environment light. Now, if you have a lot of different environments and consequently a lot of different HDR’s it can be tedious to paint out the lights and output them after that… Apart from all the other work that needs to be done anyway (merge to hdr, stitch, match to plate, etc.). Sooo, let’s try to speed things up a bit… once again :)
//01.04.2014 Update
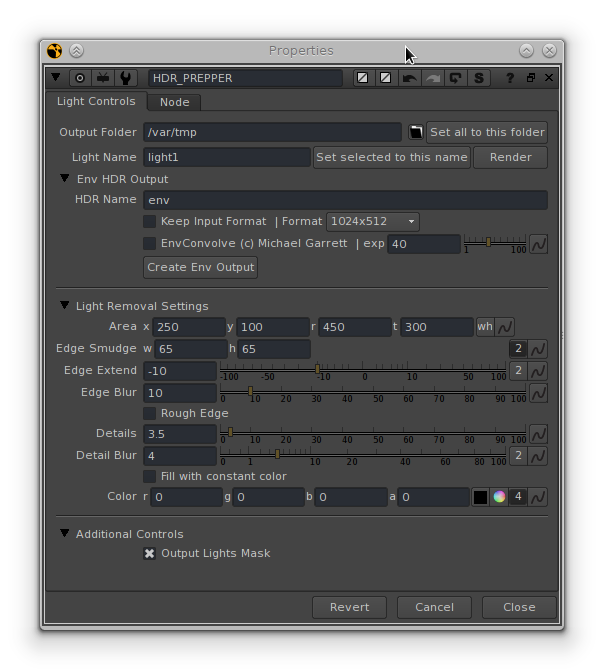
I was working on a Nuke gizmo that takes care of removing lights from an HDR with as little effort as possible. Upon creating the Gizmo you will be presented with a bounding box. This area should contain a light within the scene that you want to extract. Just put it tightly around a light source. If the HDR contains a light which isn’t planar to fit into the rectangle you can plug in an alpha into the “Mask” input. After you cleaned up one light you can proceed with adding another HDR_Prepper node to remove as many lights as you wish.
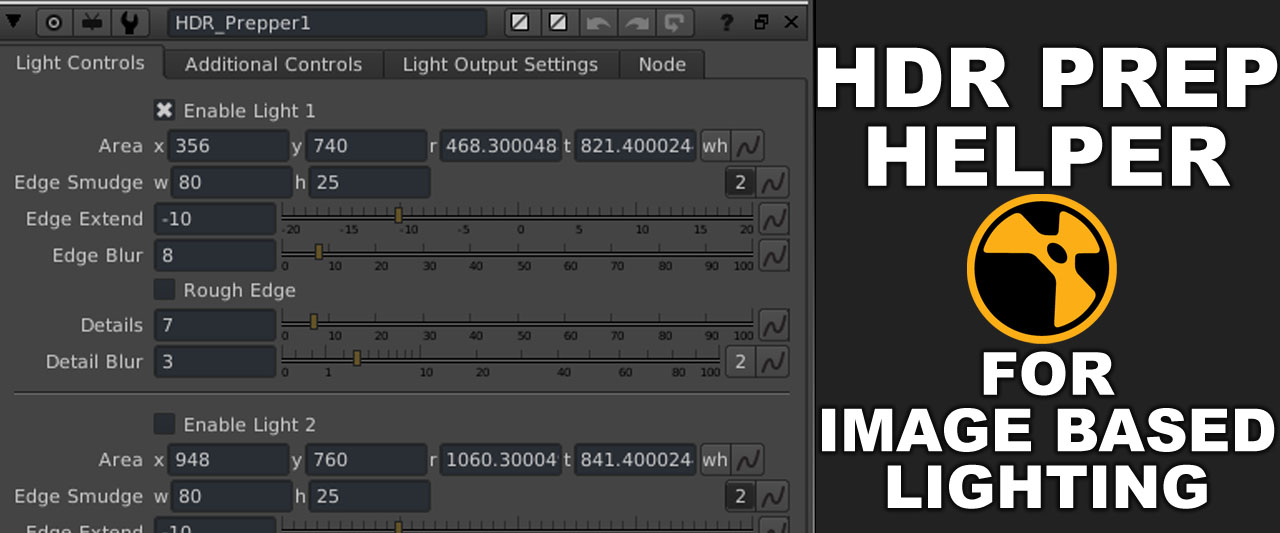
The Gizmo UI is divided into 3 sections:
The “Light Removal Settings” tab contains settings to ease the removal of light sources. It basically works by smearing in edge pixels of the crop area. Most of the knobs should be more or less self-explanatory. Either refer to the tooltips or watch the example demo further down this post :)
The topmost part of the gizmo deals with outputting both the extracted lights and the cleaned up HDR. The output path is the root path to where both the HDR as well as the lights will be rendered to. If you have multiple light sources and consequently many HDR_Prepper nodes in your script you can hit the “Set all to this folder” button to make all other HDR_Prepper nodes use the same output path.
The “Light Name” is the name of the output for the given light that you are removing. Therefore each light needs to have a unique name, because otherwise they will just overwrite each other. If you have multiple lights of the same type (e.g. multiple computer monitors that illuminate the scene) you can call one of them “screen” or “screen1″ for example, select all the other nodes which are used for the other screens and hit “Set selected to this name”. That way the selected HDR_Preppers will be called like the current one numbered numerically.
The “Env HDR Output” section deals with outputting the cleaned HDR. You can give it a name, specify a format of your choice and choose wheter to convolve the output or not. Once your settings are set you just have to hit “Create Env Output” and the corresponding nodes will be created with the settings you have chosen. Keep in mind that you need to have the EnvConvole Gizmo installed, otherwhise this section won’t work.
Aaaand again, demos explain it best, so here you go :) :
HDR Prepper Update (Nuke Gizmo) from Julius Ihle on Vimeo.
The gizmo itself can be obtained HERE.
(So far only been tested on Linux but should work regardless of the OS.)
Comments
Thank you for this very useful gizmo! I have a question, how do you adjust your lights that are skewed and need to be formatted to fit your area lights? Do you adjust your arealights scale to match your bounding boxes? This example is kind of made for this scenario however there are many lights that are distorted and need to be flattened for your arealights. Im curious as to how your workflow solves this. Again great script and time saver. Cheers!
Hi Darcel!
In short: spherical transforms.
You can convert your HDR from latlong to cubic (choose a square format) and rotate it into place. Then do your clean up work and after that convert it back from cubic to latlong and merge it over your existing HDR.
I might as well do another blog post how to do it in detail.
If you have any further questions please let me know! :)
cheers,
Julius
Thank you Julius,
I would love for you to cover that portion in your blog, this is such a great workflow method. I’m looking forward to more look dev topics being covered, especially your Katana workflows!
Trackbacks for this post