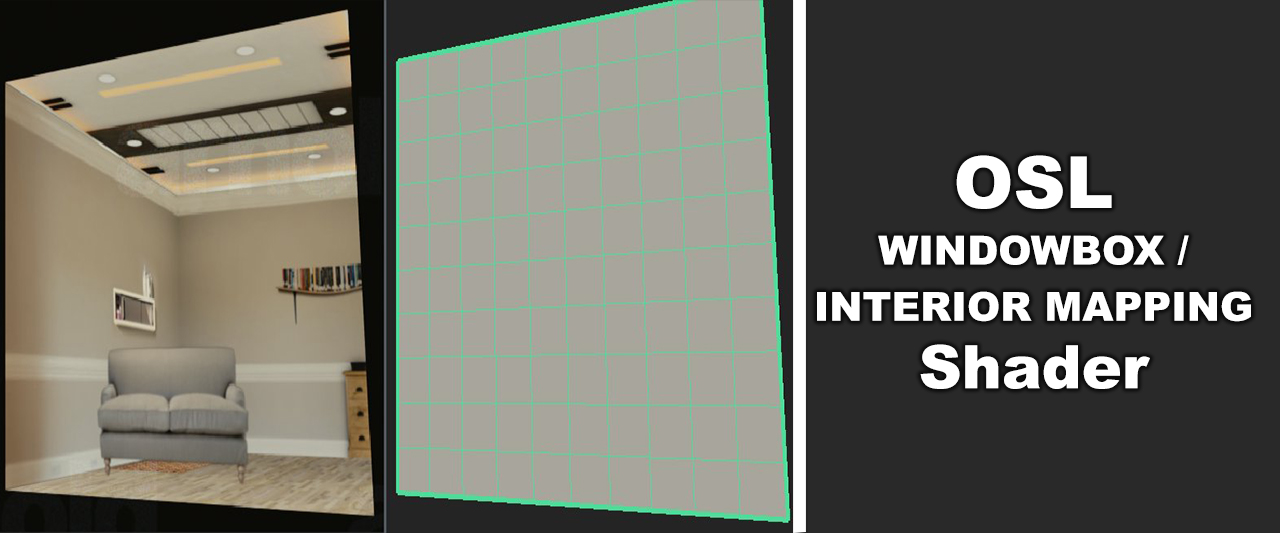
 The latest addition on my journey to OSL is a WindowBox (sometimes also called Interior Mapping or Parallax Mapping) shader.
I remember one of our teachers in university telling us about how they rendered all the interiors of the buildings in Spiderman with just a simple plane with a shader attached to it that simulates the room interior with proper parallax. Since then this has always stuck in my mind and I saw it being used in some studios I worked at whenever there was a big city to be rendered. I finally found the time (.. too much time :) ) to do this sort of shader myself in OSL!
It’s been a really exciting but also quite tough journey for a not very math-savy person like me to do this project but I have been able to mash something together that works! This shader is useful for giving the illusion of room interiors on just a single plane. It therefore safes you from modeling room interiors for mid-/background-buildings. It’s solely texture based – it takes a single input texture which should be laid out in a specific way to make sure the different sections of the room are where they are supposed to be:
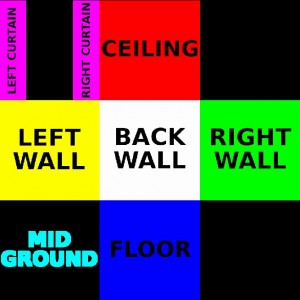
Apart from all the walls of the room you also have a midground layer (which could be furniture for example) and a curtains layer to give additional complexity and depth.
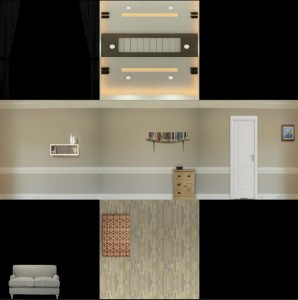
The textures can be created in your favorite 2D program, but if you have access to Nuke and you are familiar with it I also added an example Nuke script to the package for creating and laying out your own window boxes. With it you get a few convenience features so you won’t have to worry about making sure everything is placed in the correct spot.
When you create your own textures there are a couple of things to keep in mind:
- Make sure you only have an alpha in the midground and curtains area.
All walls, the ceiling and the floor should have a black alpha. - For use with RenderMan and Arnold, make sure to convert your textures to mipmapped texture files using maketx (Arnold) or txmake (RenderMan).
This is mainly for performance reasons but is a requirement for RenderMan. - If you are exporting your texture in an initial format that keeps bounding boxes (like OpenEXR), make sure that the bounding box matches your format exactly.
Most renderers will take the bounds of the data window over the actual display window (this is also the case when converting to .tex files).
If your bounds are bigger or smaller than your output format it will mess up the alignment in the shader. - The midground and curtains layer should be unpremultiplied.
Premultiplication is happening in the shader, so if your input midground/curtains area is already premultiplied you will most likely get dark edges.
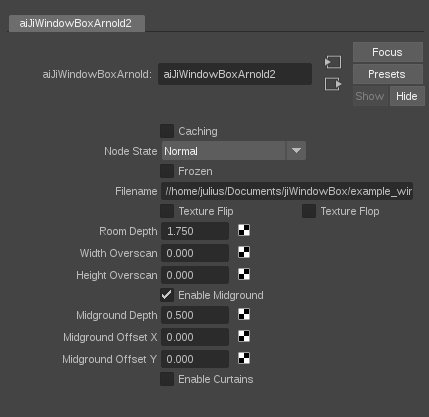
The shader itself has a bunch of basic controls for placing your room interior:
It’s a bit hard to really show what it can do with still images so here’s a quick demo which shows it a bit more in-depth:
Playing with OSL #3: Windowbox / Interior Mapping Shader from Julius Ihle on Vimeo.
If you want to give it a go you can download it from HERE (updated link for github)
The package contains the source and compiled .osl and .oso files for Blender, Arnold and RenderMan, but it should work in any other renderer with OSL support.
For use with Arnold just put the compiled .oso into a folder that you append to your $ARNOLD_PLUGIN_PATH and for RenderMan either load the .oso via a PxrOSL node or do it the nice way.
I haven’t tested it in production yet, so use with caution and modify as needed :) Some bits could be more efficient here and there… to be continued… maybe.
_________________________________________________
If this post has helped you in any way you can express your gratefulness by using the Donate Button below to buy me a coffee! :)


//UPDATE 10.10.2017 – Initial VRay version
I had quite a few people requesting a VRay version for this one as well. VRay does things a little bit different but I think I hacked together a working version and updated the download link above.
As a word of warning, I found OSL in VRay to not be that stable (might very likely be inefficiency on my side, too ;) ). Also I could not get live IPR updates working when changing parameters in the shader, but once you made all your tweaks it should render normally.
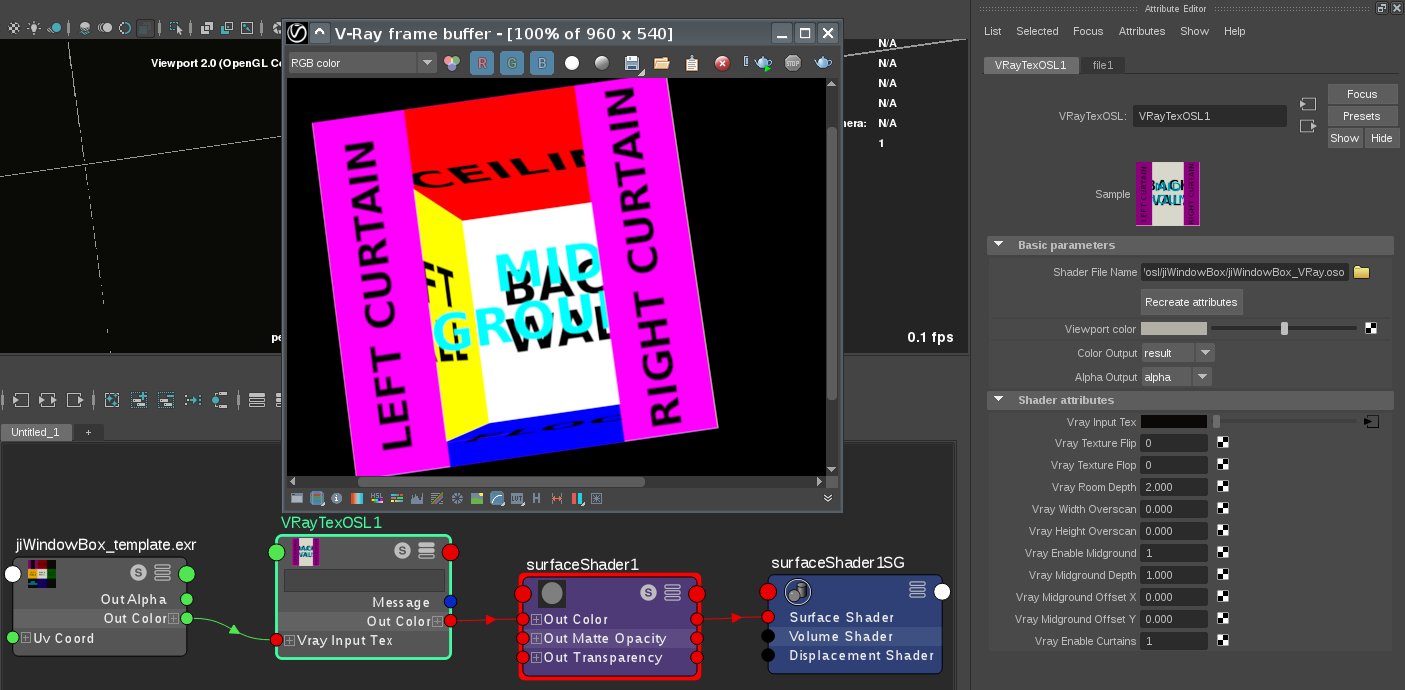
You can load in the .oso file in a VRayTexOSL node. Instead of specifying a file directly within the shader, you have to load it separately (in the case of Maya a File node seems to work nicely) and then plug it into the Vray Input Tex.
//UPDATE 11.10.2017 – Usability in Applications that have Z as the Up-Axis
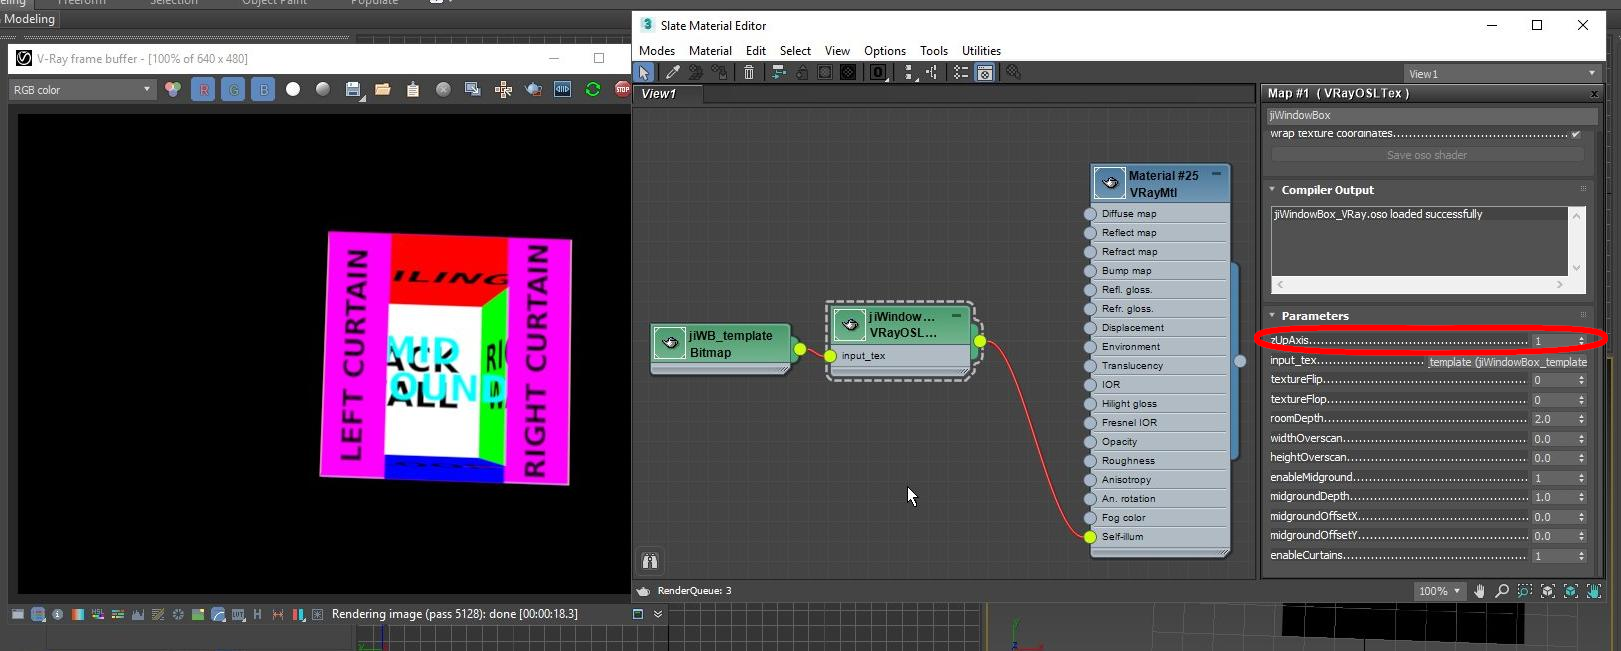
The links have been updated again specifically for those requesting support for DCC apps which have Z as their Up-Axis (e.g. 3ds Max). There’s a new switch called zUpAxis for the VRay, Arnold and RenderMan versions now. OFF (which is the default) uses Y as the up-Axis, ON uses Z as the up-Axis.
Make sure you load the compiled .oso file, not the .osl file. I got compiler issues with when trying to use it directly, but the compiled .oso seems to work in Max.
Hopefully that will do the trick.. :)
As of 03.04.2017 Zap was gracious enough to add it to the Max OSL Repo on github as well!
//UPDATE 15.10.2017 – VRay fix to use multiple Textures
I was made aware that with the VRay version trying to have multiple shaders with different textures does not quite work as it’s only rendering one of the textures. At the time of writing, the current release of VRay 3.6 in both Max and Maya has a bug that prevents the use of multiple textures. Chaosgroup is aware of the issue and will port it into the next hotfix release. If you can’t wait to try it out, there’s a way around it…
Luckily VRay does provide arbitrary user data options just like Arnold and PRMan and that actually seems to be working nicely.
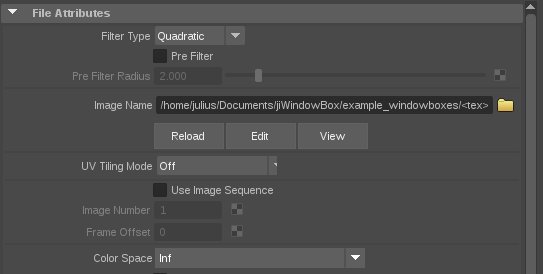
To get it working set up the material like before and assign it to all objects. In your texture node instead of having an absolute path to your texture file (e.g. /path/to/file.exr) use a user data string encapsulated in <> (e.g. /path/to/<tex>).
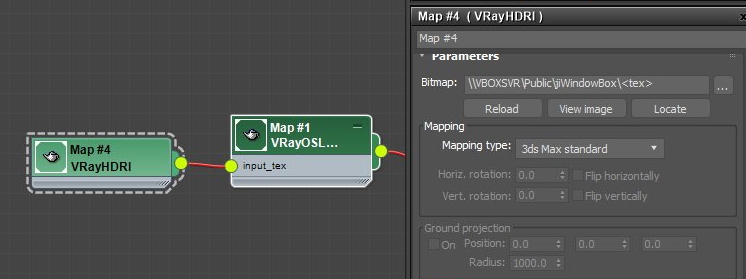
For Max you will probably have to use a VRayHDRI node instead of a Bitmap node (I didn’t find a way to edit the filepath to something custom in the Bitmap node – D’oh..)
Next you have to add the part of the filename to replace <tex> with as an attribute on your geometry.
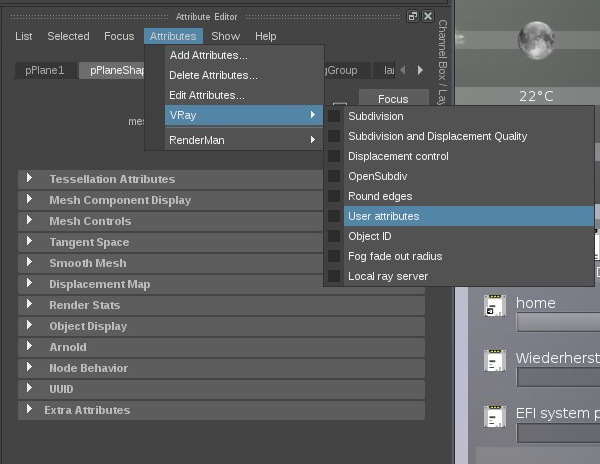
In Maya you can add it to the Shape node in the Attribute Editor under Attributes – VRay – User attributes. You then have to set your user data (in this example <tex>) to your filename (tex=file.exr)

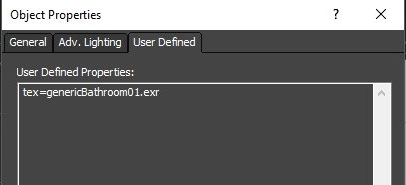
In 3ds Max right click on your geo and select Object Properties… . In the User Defined tab set the filename of your user data here (tex=file.exr).
The downside of using this method is that you cannot have individual setups for all the other shader parameters like roomdepth, etc. as they are not mappable.
From what I heard Chaosgroup is pretty quick at handing out fixes for small things like this. They have been aware of the issue for a little while now, so hopefully a hotfix will be released soon :) FWIW I heard it’s working with earlier VRay releases, too.
//UPDATE 14.07.2018 – Octane / LightWave version
A while ago I received an EMail by James Dean who kindly made slight modifications to the shader code to make it usable in Lightwave and Octane. I updated the zip above to contain his version which hopefully does the trick for those of you that are using either of the 2.
Unfortunately I don’t have access to Lightwave or Octane but I’d be happy to hear if these updates are working for everyone using those applications :)
//UPDATE 02.05.2021 – Now on github
It took way too much time, but I’m finally on github! All links are updated!
Comments
Blown away Julius. So effective and smart. Once again, well done sir!
Please keep it up I don’t see this kind of stuff very often.
Andre
Hi,
I try this in Renderman 21.5 (Maya 2017) and it doesn’t work.
I Load the “jiWindowBox_PRMan.oso” in a PxrOSL node.
I connect it in a PxrConstant shader assigned to a plane.
My PxrOSL node can’t read the texture file and my plane rendering only a blue color.
// Error: (10/09 17:53) rfm Error: S21002 OSL could not open texture “G:\Bureau\WindowBox\sourceimages\jiWindowBox_examples\jiWindowBox_template.exr”. [ Object: Shader: PxrConstant1_126_0]
can you help me on that trouble?
Thank
Anthony
Hi Anthony,
Can you try converting that texture to a .tex file? After you have done that verify that the texture is working and make sure you use the correct path.
Judging from the error message it seems like the path for the image file you specified is not correct, but working with RenderMan it’s always best practice to convert all your textures to .tex files anyway :)
Let me know if that works!
cheers,
Julius
It works fine with a .tex file, thank you.
However I’m not able to use “Midground” and “Curtain”, I switch to diferents value but nothing appears… Have you got an idea what I’m doing bad?
with “jiWindowBox_template” texture.
Hi Anthony,
Yes, you are totally right – that was my bad! The jiWindowBox_template texture was an older version that I had which did not have an alpha for the curtains and midground layer! All the other textures should hopefully be working.
I updated the package and the article now along with a checklist to avoid common pitfalls like this :)
Thanks for your feedback and for testing! Hopefully it’s all working for you now!
cheers,
Julius
Ok I missed that in this texture. I tried with other one and It works perfectly.
Thank you for this tool and your quick reply.
Anthony
you should put oso file at the system hard driver
Hi Julius, this looks great and incredibly useful!
I’m having trouble getting it to work properly in VRay, and each of the .oso files that you’ve provided behave slightly differently. I don’t suppose you have experience using OSL in Vray?
I haven’t had access to VRay in quite a while but I’ll see if I can get ahold of a demo version to test it out.
Taking a rough guess I’d assume that the Arnold version should probably give you the closest result, but like I said I’ll try to look into it soon… Watch this space :)
Thanks so much :)
(and you’re right; the Arnold version is the best of the bunch!)
Julius, Matt, anyone, I’m also pretty much interested to get a compatible version for Vray.
It’s a very smart way to populate a building… Don’t know who got the idea first but that’s brilliant ^^
If you find any way to make it available for Vray, do not hesitate to publish it !
For a similar V-Ray shader, check this thread on the V-Ray forum from last year:
https://forums.chaosgroup.com/forum/v-ray-for-3ds-max-forums/v-ray-for-3ds-max-wishlist/63451-interior-mapping-shader?p=812470#post812470
Best regards,
Vlado
I’m humbled you found your way here, Vlado! :)
Unfortunately I cannot access that link, but thanks for sharing!
I just updated mine with a version for VRay, too!
Thanks Julius, It works perfectly, I just tested it on Vray 3.5 in maya.
I was just wondering one little thing… Do you think it could be possible to add some other midGround layers ? Maybe using top right and bottom right corners of the source texture ? The rooms seem to look a bit empty at the moment ^^
Of course we would need three midground depth parameters…
Thanks for this; would also love a Vray version for this shader.
This brought some memories back when using the vRoom plugin:
http://www.euriskostudios.com/es/plugin_pages/vRoom.php
Hi guys,
I updated the download link and article above with a version for VRay! Let me know if it works for you!
cheers,
Julius
Thanks a lot for doing it so quickly!
I’m still having no luck in Max, and I’m wondering if it’s because Max uses Z up, and Maya uses Y up?
3dsmax 2016 vray 3.4 error compliing/ why? syntax error too
I was using VRay 3.6 on my side, maybe that’s a problem if you are trying to use it with older versions. Can you give specifics about the errors?
You shouldn’t have to compile it yourself, just use the provided .oso.
//Edit: I heard from other people that they can use it in Max but it doesn’t quite work… Probably because Max is using Z as the up axis. If I can get my hands dirty on it I will give it a whirl to see if I can give you something workable :)
Please do something for Max. I’ve been waiting for something like that for ages.
Please !
Thanks for your interest, guys! I haven’t touched Max in a long while but looks like it’s time now… :)
I will hopefully get to it in the next couple of days… I’ll update the article as soon as I’ve got something going.
WOW thank you so much Julius for developing and sharing such a fantastic tool! I remember reading an article about a similar approach used to detail building interiors for New York in the Spiderman films and thinking “agghhhh so jealous that I will never have access to something like that!” I am a 3dsMax and Vray user myself and after experimenting with the vray oso file you provided I reached the same problem that others have posted about. The texture coordinates seem to be wrong inside of 3ds max, so that the room only shows distorted views of the ceiling. Changing the room depth parameter let me see more of the room but still distorted. Here is a screengrab of the render: https://www.dropbox.com/s/rqmtjldiapc9sny/3dsMax_vray_screengrab_TL_01.JPG?dl=0
Again, I am so appreciative of the time you put into documenting and sharing this great free resource :D
Hi Tim,
Thanks a lot for the kind words and the screenshot to illustrate the problem!
I’ll try to get something going with a Trial of Max and VRay as there are a lot of requests for it :)
I however probably won’t get to it before Saturday, but feel free to check back in towards the end of the week. I’ll update the article as soon as I have news.
Thanks for waiting :)
Best,
Julius
Hi guys,
The fix to get it working for Max was easier than expected… Play around with it and let me know if it does the trick for you! Tested with Max 2018 + MaxToA and VRay 3.6.
cheers,
Julius
Hi Julius,
I’m getting a Could not find stdosl.h. error. This is the first time I’m using OSL, so it might be an unrelated problem. Any ideas on how to fix this? I’m using Max 2014 + VRay 3.6
Keep up the great work,
Cheers
Hi Haluk,
Are you trying to load the .osl file? I get a lot of errors with that, too. The VRay OSL compiler seems to have more restrictions from what I can tell, but it might also be something that I’m missing.
If you load the .oso file it should work. Make sure you are loading it with a VRayTexOSL node, NOT a VRayMtlOSL node.
Let me know if that works for you!
cheers,
Julius
It works. Thank you Julius the Genius !
Julius,
Thanks for the osl version of your shader for 3ds max and vray. It works very well. The only problem I’m running into is that it seems to only evaluate one instance of the shader at a time. so if I have 4 squares and they have 4 different vray materials with your osl with different bitmap rooms, only one of them renders across all 4 squares.
If any one else using vray and 3ds max 2016 (or other versions) experiences the same thing I’d like to know. Could be an anomaly on my end or just a max thing overall.
Thanks again.
V Miller
I’m having the same problem unfortunately!
I’ve even tried duplicating the .oso file and renaming them so that each texture node has its own .oso, but am having no luck!
Yep, same behaviour here. Only one instance of the texture is rendered.
Using 3ds max 2016
Hi guys,
Thanks for the feedback! Sounds like something Max-specific… I will try to look into it the next few days.. Thanks for you patience :)
cheers,
Julius
Hi guys,
Sorry for the delay on this.. Only really had time today. I updated the article with a solution for the VRay version as some things seem to be working a bit differently with it… It’s a solution for now, I’m hoping to hear back from Chaosgroup, too :)
Let me know if it works for you!
cheers,
Julius
Thanks Julius. That method works fine. Hopefully the Chaosgroup will contact you with some additional insight as to how their osl implementation works.
Thanks again for taking time to do this.
V Miller
Just got a reply from Vlado. It’s a bug and they are aware of the issue and will plug a fix into the next hotfix release!
Hi Mate,
Awesome job! I’ve placed the osl file in the correct path in c4d. It loads the shader but in the console I get an OIIO error. Is this shader c4d compatible or only Maya?
Thanks!
Hi,
Thanks for the kind words!
In theory it should work regardless of the host-app. It’s mainly about the renderer… Which one are you using?
If you get an oiio error that might suggest something is wrong with the image you are plugging in. Can you share the full error message you are getting?
Unfortunately I don’t really have access to C4D, so please bare with me here… :)
Thanks for your feedback!
-Julius
Hi Julius,
Thanks for your response. I’m running C4d r18 with Arnold 5 v2.2
This is the error that I get:
C4DtoA | 00:00:00 692MB WARNING| unable to connect image() to jiWindowBox_Arnold(filename) – types are not compatible (RGBA to STRING)
C4DtoA | 00:00:00 722MB ERROR| [texturesys] unspecified OIIO error
C4DtoA | 00:00:00 722MB ERROR| [texturesys] unspecified OIIO error
C4DtoA | 00:00:00 722MB ERROR| [texturesys] unspecified OIIO error
C4DtoA | 00:00:00 722MB ERROR| [texturesys] ImageInput::create() called with no filename
C4DtoA | 00:00:00 722MB ERROR| [texturesys] unspecified OIIO error
C4DtoA | 00:00:59 760MB WARNING| unable to connect image() to jiWindowBox_Arnold(filename) – types are not compatible (RGBA to STRING)
C4DtoA | 00:01:33 760MB WARNING| unable to connect image() to jiWindowBox_Arnold(filename) – types are not compatible (RGBA to STRING)
C4DtoA | 00:02:11 771MB WARNING| unable to connect float_to_rgb() to jiWindowBox_Arnold(filename) – types are not compatible (RGB to STRING)
Hi there,
Sorry for the delayed reply. This error sounds a lot like you are creating a separate node in which you specify your image and try to connect that to the filename of the windowbox shader. If that is what you are doing try to specify the filename as a normal string directly in the filename input (like I did in the demo video).
If that’s what you are doing already let me know and I’ll try to get my hands on a C4D demo to test it :)
Thanks,
Julius
Oh wow! What a bloody simple fix!
I was indeed creating a texture node and connecting it to the input. When i copy the string it works like a charm!
Awesome work mate, can’t wait to make some stuff with this!
Thanks, Remco!
Cool, glad to hear it’s working! Feel free to share your renders if you have something!
Curious to see!
Enjoy,
Julius
Thank you very much for the shader. Working great so far in Max and Vray.
But I have one big problem, I haven’t managed to get my own exr texture working with the shader. I tried with Photoshop and Affinity Photo, but it simply doesnt work. It seems that he doesnt really use the alpha map.
Is there any trick I have to do to make in work via photoshop?
Hi there,
Thanks for your kind words!
I just had a look at exporting from Photoshop and it seems to work fine. What you need to make sure is that you only have values in your alpha in the curtains and midground area. Make sure there are no values above 0 anywhere else.
My Photoshop knowledge is a bit rusty but I got a functioning alpha out of it by creating a new alpha channel in the Channels tab, filling some bits in the midground and curtains area with white and creating a new layer at the bottom of the layer stack that is solid black. I then saved it as a tif, unchecked “save layers” and “save transparency”. Best to check your image after you save it out with another image viewer afterwards… The way Photoshop handles alpha is still a mystery to me :)
Let me know if this works for you!
cheers,
Julius
Hey Julius,
thank you very much for your quick answer. I got it working. I saved the exr via the exr-io plugin for photoshop, this caused the issue. Saving it via the normal exr format option from photshop worked without any problems!
Another question, is it possible to get shadows from the curtain and/or midground layers? So that you get nice shadows in the room itself. This would make the shader even more “believable”.
Cool, good to know that it works!
This shader is solely texture based mainly for performance reasons (and secondary because anything else would probably be way over my head :) ), so unfortunately there won’t be any way to get things like shadows.
You can of course bake in some shadows in the textures. Keep in mind this is really only meant for midground and background assets. For closeups you’ll be better off modeling an actual room + interior.
Hope this makes sense!
cheers,
Julius
Thank you , Sir…This have saved my ass in a recent production. :)
MERRY CHRISTMAS!!! Julius.
Great to hear that you found it useful! Enjoy the holidays, too!
This shader is working great for square boxes, is there any way to create rectangle versions? (e.g for open plan offices)
Hi Grant,
Thanks for the kind words!
The shader just work well for any aspect you desire, as long as you tweak your texture to reflect the aspect ratio of the plane you are trying to map it to. So if your window has a width of 3 and a height of 1 (3:1 aspect) for example you need to make sure the floor, back and ceiling are stretched 3 times as much in comparison to a 1:1 (square) aspect.
Here’s a screenshot that hopefully illustrates it better:
http://53035544.de.strato-hosting.eu/data/wbox_template_stretched.jpg
Let me know if this works for you!
cheers,
Julius
Hi Julius,
Yeah i thought that would work and tried it earlier but instead of get nice straight lines, i get this strange warped effect on the left/right walls: https://ibb.co/j3wNhR
It’s not hugely obvious at an aspect of 2:1 but when you go up to 3:1 or 4:1 it starts to look really crazy. Adding extra depth also adds even more distortion.
Any ideas what I am doing wrong? I am using v-ray & 3ds max.
Thanks for your help,
Grant
Here is a better (more extreme) example, aspect is 4:1 + 4 depth: https://ibb.co/nre1sR
Yep, that does look indeed a bit odd. I have an idea what could be the issue, but unfortunately I am not able to test it as my VRay trial has run out. I’ll try to see if I can extend the trial for a bit, but can’t make any promises unfortunately.
I find the OSL implementation in VRay a bit odd sometimes as it’s quite different from other renderers, but it’s likely I am missing something as well.
Seems to be something VRay does different. I tested it in Arnold, RenderMan and Blender and don’t see that issue. Can you try freezing your transformations, maybe?
cheers,
Julius
Hi Julius,
Thanks for the quick response. Tried freezing my transforms but that doesn’t fix anything.
I might be able to get you a remote vray licence while you solve the issue if that helps? Just let me know if/when you are free and i can shoot over the licence server details.
I’ll just stick to 2:1 & 1:1 aspect ratios for now!
Thanks,
Grant
Hey Julius,
First of all, impressive work you’ve developed here.
Are there any news from Chaosgroup regarding the use of multiple shaders with different textures?
Your workaround works fine for now, but would be really good to have a fix for multiple materials, for workflow’s sake.
Also regarding 3dsmax+vray, the use of such OSL/OSO shaders seems a bit unstable as we have random 3dsmax crashes.. not always, but sometimes after freshly opening a scene with some VRayOSLTex materials already previously applied, 3dsmax immediately crashes as we open the material editor for example.. seems like it even has some issues displaying the material preview in the sample slots..? does anybody have the same instability once in a while ? could it be a vray handling issue or some bug(?) inside the vray OSO file shader itself ?
Would be great to have a hotfix soon so that these shaders could be properly implemented in our workflow.
Thanks in advance !
Hi Luis,
Thanks for the kind words. I am unfortunately not up to date with Chaosgroup’s latest releases but from what I understand they are doing very quick turnarounds, so I’d look out for nightly builds and their release notes if anything indicates texture OSL fixes.
It’s unfortunate to hear you are having stability issues. I had the same with Max+VRay, but I was hoping it was due to the fact that I was running it only in a virtual machine. Interestingly Vray for Maya was a good deal more stable (although I still had the occasional crash), while Arnold+Max did not crash once on me, even tough I was just running it on a virtual machine.
I found VRay’s OSL implementation does a few things different from other renderers and even some simple tests were a bit crash-y on my end. It’s likely I am doing something not as intended, but unfortunately my VRay trial has run out, so I am unsure as to when I can hop back on it.
My best bet for now would be to watch out for updates from Chaosgroup like I mentioned previously. Other than that – watch this space… Hopefully I can have a look again soon.
cheers,
Julius
Hi Julius, I would love to have your jiWindowBox on our 3ds Max OSL github. I could put it there myself, however we require the shaders to be under the Apache 2.0 license (a very persmissive open source license). Would it be okay for me to add that? Or do you want to submit yourself? Let me know :)
Hey Zap,
I’m humbled you’ve found your way here and would like to add it to the 3ds Max OSL github repository! I’d certainly be happy to move foreward with this. If you need a special written permission or any additional information feel free to shoot me an EMail at julius.ihle@online.de!
Thanks!
-Julius
You should have an email :)
/Z
Sorry to ask, but how is the node setup in Blender? Because I connect the texture node to the OSL node then to the shader node wich is diffuse and then to the output and gives purple output
Always welcome asking :)
The setup in blender is the same as for the other packages. The filename parameter is a direct texture input, so you can give it a path to the texture file in the jiWindowBox node directly. If you try to connect anything other than a string to the filename it will error out.
Hope that helps!
Is there an example .blend available somewhere? I haven’t been able to get this going in blender so far, but would love to be able to make use of this. I suspect it’s something simple I am missing; an example blend file would clear up the confusion nicely.
Thanks for the hard work!
Hey Phil,
Sorry for the delayed reply. At which point are you stuck exactly?
Unfortunately I don’t have Blender around at the moment but there’s a video on youtube going through the Setup in Blender (although it’s not in english it should be easy to follow): https://www.youtube.com/watch?v=dW48uFblUx4
Let me know if this works for you!
cheers,
Julius
Awesome work Julius! I remember watching something similar in Avengers (NY scene) and was blown away by it. Haven’t been able to get it to work in octane/c4d. Probably doing it wrong? tried copying/pasting the code to the osl texture node and compiling it. Creates the parameters and projects the texture, only that the projection seems wrong. Any thoughts? Either way, thanks for sharing!
Hey Henry,
Thanks for the kind words :) Unfortunately I do not have access to C4D or Octane… But your question reminded me that a while ago James Dean mentioned he re-worked some bits of the shader to make it work in Octane and Lightwave so maybe that will help. I updated the post above now – give it a go and see if it works for you :)
If not – can you post a screenshot of how you are using it and the rendered result? Maybe that gives some indications as to what might have gone wrong.
Thanks,
Julius
Hey man, this is awesome!
I’m having an issue with reading the latlong from you nuke script. It says reference_latlong.exte9: can’t read front file… am I missing a file? I don’t see it in the folder that I downloaded it with. Thanks!!
Hey Jordan,
Sorry for the late reply! Not sure what that’d be. Is there a full error message you can paste? All the files should be included in the zip and the Nuke workflow is explained in the second half of the video on vimeo.
If there is anything specific you feel you are missing please let me know :)
Thanks,
Julius
Wow …… Thanks For Sharing
Hi Julius!
This looks amazing! Is there any chance to do an update for Redshift for Maya? Would really appreciate it! Or is there a way to use it inside Redshift for Maya as is?
Thank you!
Hi Christo,
As far as I can tell Redshift unfortunately does not seem to support OSL so the shader won’t work for the time being. If they add support for OSL at some point in the future it should work as with other packages :)
Thanks,
Julius
Hi Julius, is this still a live project? Redshift now supports OSL, but using the shaders meant for other renderers, I get strangely distorted results. Any chance You’d take a look a the Redshift version?
Cheers,
Ivan
Hey Ivan,
Unfortunately I don’t have access to Redshift and I’m not familiar with it. Do you have some example renders to show the problem?
Thanks,
Julius
Hi Julius,
after experimenting for a bit, the Arnold version seems to be closest to what I’d expect to see. Out of the box, the corners of the walls, floor and ceiling start at the corners of the UV space (this is not the case for other versions of the shader) and the Back wall is mapped to the center of the polygon, where you’d expect it. But the projection appears to be flipped, in a weird way, so if you look at the window plane from further down, instead of seeing more Ceiling on the upper side, you get more Floor on the bottom side. Also, there’s a weird curving of the edges going on, as seen in this screenshot: https://www.dropbox.com/s/bzbaqwt87ebprg0/Screenshot%202021-03-23%20143100.jpg?dl=0
Cheers,
Ivan
Hi, amazing work.
Im trying to get this to work in C4D/OCTANE. Everything compiles fine but projection looks strange. lots of stretched and warped images. I’d post you a image if i knew how.. Perhaps could email you? Would be amazing for production to get this working. Thanks so much for your effort!
Hi Julius,
Thank you for sharing! I didn’t find your Nuke template in an archive, can you please send it to me or upload somewhere?
Thank you!
Hi Efim,
The Nuke template is part of the example windowboxes package :) Here’s the direct link: http://53035544.de.strato-hosting.eu/data/jiWindowBox_examples.zip
cheers,
Julius
Hi Julius, I was wondering if you ever tried this OSL on Clarisse 4.0 ? I am getting some Parser errors in my shell that disappears if I remove any WindowBox shader. I’ve contacted Isotropix to get more details about the parser errors, though I’d love to hear if you’ve had it working on your tests
Hi Priam,
Unfortunately I haven’t touched Clarisse in a while. If I remember correctly tough I think I saw some posts on the Isotropix Forums that mentioned it was working. If you could post the errors you are getting maybe it will give me some indication as to what might have gone wrong.
Thanks,
-Julius
After a bit of back and forth with Isotropix, we have discovered that this bug was due to the size of the file that is saved out by Clarisse 4.0. After around half a million lines written, it will leave a few corrupted characters in the scene file. It only happened to fall on a segment using OSL : )
All clear !
Hey Priam,
This is great news! Glad it all worked out for you. If you have any renders you’d like to share I’d be happy to see them :)
Thanks,
Julius
Hello Julius,
Thank you so much for creating this amazing masterpiece script!
I’ve been playing around with it in both 3ds max and blender and I noticed that in blender the curtain and midground is flipped.
So I had to switch curtain box with mid box of the exr file in photoshop. Its not a big issue, but I was wondering if there is any way to make the exr image file work universally in both max and blender (actually, 3dsmax octane has same issue like blender). So ideally without change the exr location of the curtain?
That would be amazing to have 1 script and 1 exr image work universally for all the renderers!
Best,
Art
Hey Art,
Thanks for your comment and sorry for the late reply!
I’m unfortunately not entirely sure what could be the reason for this and I’m a little bit low on time at the moment to look into this as I’m also not that well versed in either Max or Blender :)
If it becomes pressing please let me know and I’ll see what I can do!
Thanks,
Julius
I have a C4D Octane example build of Windowbox I’d like to share on this page…?
Hi Ed,
Feel free to send it to my EMail: julius.ihle@online.de
and I will put it up :)
Thanks,
Julius
Hey man,
Awesome what you’ve accomplished.
i just tried it in octane – only issue i can see is that the middle and curtain layer are somehow switched up in octane/c4d.
So when you activate Curtains, the middle layer sticks in front.
Im open to test optimizations in c4d/octane for you, if you want to get down to it. Just drop me a mail.
thanks,
Romeo
Hi Julius
Thanks for the OSL code, seems your code will get more attention due to the release of the wParallex textures recently.I was able to modify some basic things in the code like additional “People” layer and a 2nd “Furniture layer” aswell porting it 1:1 Unreal4. Works Perfect!
I wanted to try to add shadows like described in this blog entry:
https://andrewgotow.com/2019/02/27/interior-mapping-part-3/
but i am struggling quite a bit as the approaches are slightly different. Any advice on how to approach it?
Thanks in advance and all the best.
Marko
Nevermind, got it working.
My solution/approach:
1.) Create a Unitcube (1,1,1) out of the horizU and vertuV etc values
2.) Transfrom the SunVector to local Normal
3.) Make a Plane-Ray-intersection – resulting values in the domain 0-1 are your UVs for the input of the Shadow texture.
4.) Adjust as necessary to accommodate roomdepth/aspect-ration/blurriness/UV 1/3.
Hope that helps someone.
Marko
Helo Julius,
thank you for your nice work and for making it available for everyone!
I was just trying your shader in Vray-next, and it looks like it works perfect with cubes, but when I use it in other aspect ratios than 1:1 I get a lot of perspective deformation:
https://ibb.co/hKTNK21
I read another user that asked for the same time ago, but as there is no solution on his questions, I just though to ask again. So it is a Vray problem? is there any workaround?
thank you very much!
Hey Manel,
For me it’s a bit hard to debug unfortunately as I don’t currently have access to vray.
What you can do to check yourself is 2 things:
1) make sure the UVs are the same as on the square plane
2) make sure the transforms are not frozen. If you’re visualizing the PRef for example it should look the same as on a square plane.
Hope that helps!
Best,
Julius
Hi,
thank you very much for your answer!
So. I am not sure if I understood you:
1) If I do that, it works perfecly, because the plane is ratio 1:2 and if I put the UVs of the square plane I get to cubes inside the “big” one: https://ibb.co/1n7gVxy But what I am trying to achieve is to “strech” the texture as you suggested in a past post: http://julius-ihle.de/?p=2451
2)Here I do not understand what you mean: The plane has no transforms on it, it is just an editpoly…and the images that I am sending you are fast vray renders with IPR
thank you again!
A little late to the party, but this is really awesome stuff. I’ve managed to use the Vray version on a Railclone object and it’s working amazingly except for one issue: the midground and the curtains are the wrong way around. I know you said you can’t really troubleshoot Vray problems, but I wondered if you had any insight in to whether this is something to do with how the OSL code is written?
Someone on the Railclone forum apparently had the same issue and dealt with it in what’s probably the most pragmatic way: by swapping the two parts of the textures around. https://forum.itoosoft.com/railclone-pro-(*)/osl-parallax-mapping/
OSL for Arnold to swap reading Midground and Curtrains positions without editing EXR. I don’t understand how I did and how it works but it works if you change this lines:
midgroundUV[1] = (1-midgroundUV[1]) – 2.0/3.0;
color curtainsUV = objPOrig * color(1.0/3.0, 1.0/3.0, 1);
curtainsUV[0] = 1.0/3.0 – curtainsUV[0];
curtainsUV[1] = 2.0/3.0 + curtainsUV[1];
Hi,
thank you very much for creating the shader, it really is awesome and super helpful!
Is the shader in any way software or scale dependant? When using it in Maya Arnold it works great, but exporting the same plane to houdini and applying the shader there (Arnold as well) results in a very distorted image.
Been trying to figure it out for a few hours now, but did not really come closer, would appreciate any insight if there is something to take care of with regards to scaling.
This is fantastic, thanks for sharing! Any idea if it’s possible to make this work with non-vertical windows, eg skylights, so that the fake room box is rotated to maintain the expected orientation?
However, there was a big issue with the original script for longer parallax effects walls were getting really distorted and this issue has kind of stopped me from playing with the shader for some time until David McDonnell posted a windowAspect fix on Facebook, it was a game-changer, now it was possible to create really long spaces without wall distortions. In the end, I also figured that it would be great to create both night and day versions of the same space, which would give some flexibility for Archviz projects.
Hey Julius,
is there any UE4 support for this great tool yet?
When I freeze transformations on the window with my parallax shader, the image becomes distorted. Does anyone know how to fix this?
Ok I think I am stupid. I want use your script but I am net understanding how or where to install it properly
Cheers
Alan
Trackbacks for this post